How To Sell Fonts Online And Turn Your Designs Into Sales
Selling fonts online is one of the smartest ways to turn creativity into recurring income.
If you’ve ever designed a typeface and wondered how to actually make money from it, you’re in the right place.
In this step by step guide, you’ll learn how to sell fonts online, choose the right platforms, price your work, and attract buyers who are happy to pay for quality.
No fluff.
Just the exact process creators use to sell fonts online and build a real digital income stream.
How to design fonts that sell
There are thousands of fonts out there that people can use for free. If you want people to buy yours, you need to make something that’s worth paying for.
With that in mind, here’s our step-by-step guide to creating fonts that customers want…
Find a gap in the market
Step number one is to do some research to find a gap in the market that you can fill. The goal is to find a font niche that has high demand but low competition.
I’d suggest starting with keyword research to see what kind of typefaces people are searching for.
An easy way to get started is to enter a search string like ‘fonts for…’ on Google and look at the search suggestions to brainstorm some ideas.

Then, browse font libraries like MyFonts and Creative Market to see how many people are already selling fonts that match those search queries.

If you find a font-related keyword that has a high search volume but low competition, you might want to target it.
For example, you might find that lots of people are already selling ‘book cover fonts’, but few people are selling ‘Horror book cover fonts’ specifically, despite this having a high search volume. This would be a gap in the market.
Decide what type of font you want to make
Fonts come in all shapes and sizes. Once you’ve identified what your target market/niche is, the next step is to decide what kind of font you’re going to create.
Your options include serif fonts, sans-serif fonts, block fonts, brush fonts, blackletter fonts, etc.
Different font styles are better suited to specific niches than others.
For example, if you’re targeting a niche like ‘romantic fonts’, then a delicate handwritten/script font is going to be a better fit than something like a bulky blackletter font.
Decide what glyphs to include
Next, decide what glyphs your font will include.
That choice comes down to the type of font you’re creating, your niche, and who you’re selling to.
Some designers do well with simple all caps fonts that only include A to Z. And yes, that can work.
But in most cases, more characters equals more value.
Aim to include uppercase and lowercase letters, numbers, punctuation, and multilingual characters. Buyers expect it, and they’re more willing to pay for it.
If you want to stand out, add extras like alternates, ligatures, or multiple weights. A complete font family feels more premium and gives people more reasons to buy.
Choose your font creation software
Even if you’re designing your font by hand, you’ll need to use font creation software to compile all the separate glyphs you draw into a font file.
There are tons of font creation tools out there to choose from.
I’d recommend Glyphs for Mac users. It’s the gold-standard font editor and is widely used by industry professionals.

What about those running Windows? I’d recommend upgrading to a Mac and using Glyphs. Only joking.
Windows has plenty of good options. These include FontCreator, FontLab, and FontForge.
You might also want to use a vector design app like Affinity Studio or Inkscape to design or digitize your glyphs. I particularly like Affinity Studio. It was acquired by Canva and made available for free. So, essentially you’re getting premium software for nothing. Jackpot.
Design your glyphs
There’s no one-size-fits-all process for designing font characters. Each type designer has their own method.
That said, here are some general tips to keep in mind:
- Start on paper. A lot of designers find it easier to start designing their fonts on paper initially, before scanning it onto their PC and tidying it up in professional graphic design software.
- Use guidelines. Mark out the baseline, cap height, x-height, ascender height, descender line, and other important letter heights so you can keep them consistent across all your glyphs. If you’re working in Illustrator, click Show Rulers to help with this.
- Be consistent. Consistency is key when it comes to fonts. Make sure to maintain consistent stroke widths, alignment, and proportions across the board, and use the same canvas size for each glyph.
- Test out different sizes as you go. See how each character looks in different sizes. Often, a font might look great in large sizes but be unreadable in smaller sizes.
- Pay attention to kerning. This refers to the spacing between pairs of characters and is built into the font file. Pay close attention to kerning and make sure to kern your font so that the text is readable and visually pleasing.
- Save glyphs as vector files. If your glyphs are hand-drawn and digitized, save them as vector files (e.g. SVG). If they’re rasterized, convert them to vectors first using a tool like Illustrator or Inkscape.
Compile them into a font file
Once you’ve designed your glyphs, use your font software to compile them into a font file.
The way to do this depends on the software you’re using, but it will usually involve importing the vector glyph files and then mapping them onto appropriate character slots/assigning them to a corresponding Unicode character.
After that, export your font as an OTF or TTF file. You can also use the WOFF or WOFF2 file formats for web fonts.
Test your font
Download the font file and install it on your computer to test it out.
Try using it in different applications like Photoshop, Illustrator, etc. to make sure there are no compatibility issues.
Use it at different sizes and check for issues with alignment, kerning, spacing, readability, etc.
If you’re not happy with anything, go back and edit it, then export it and test it again. Repeat the process until you’re sure you’re 100% happy with everything.
Create preview images
Once your font is ready, it’s time to show it off.
Preview images sell the font, not the file itself.
Create at least five previews that show your font in different weights, colors, sizes, and real world layouts.
The goal is to help buyers picture exactly how they’ll use it. Get them inspired by your fonts and you’ll make sales.
You can make these with tools like Affinity Studio, Photoshop, or Canva. Simple works. Clarity sells.
How to sell fonts with Sellfy
The best way to sell fonts is through your own online store.
With Sellfy, you can set everything up fast. Like, real fast. No technical skills required. Upload your fonts, connect payments, and you’re ready to start selling from your own site.

When you sell fonts on third party marketplaces, they take a big cut of every sale. Sometimes more than 50%. And when you promote your fonts? You’ll be promoting your competitors as well.
Selling through your own site changes all of that.
You control your pricing, your licensing, and how your brand shows up. You’re building your own asset instead of sending customers somewhere else.
Yes, you’ll need to bring your own traffic. But that’s fixable. I’ll show you how later.
For now, let’s walk through how to build your online font store with Sellfy, step by step.
Step 1: Log in to your Sellfy account
Sign up for Sellfy and log in to your account. If you don’t want to commit to a paid plan yet, you can get started with a 14-day free trial.
Once you log in, the setup wizard will set up a basic online store for you. Just enter a name and description, and choose a color for the theme.

Step 2: Add a digital product
From the sidebar, select Products > Add new product > Digital product.
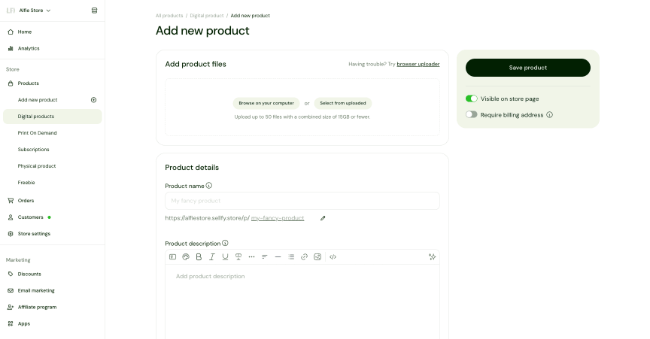
Then, browse your computer or drag and drop to upload your font file. If you want to sell multiple fonts together as one bundle, upload all of them.
Step 3: Enter the product details
Next, we’re going to complete the Product details section.
First, enter the name of your font under Product name, and write your Product description.

The description should include all the information customers might need to know about your font, including:
- What glyphs are included
- What weights are included
- File types
- Instructions on how to install it
- Languages supported
- Applications supported
- Licensing terms
After that, upload the Product preview images you created earlier (you can also add a video if you prefer).

Step 4: Set your price(s)
Under Price settings, enter the price you want to sell your font at.

Pricing your fonts is up to you, but most sellers land in the $10 to $30 range.
Non exclusive commercial licenses usually sell for anywhere from $10 to $100 or more. Since you can sell the same font over and over, this is where most creators focus.
Exclusive licenses are a different game. They can sell for thousands, but you only sell them once. That route makes more sense if you’re doing custom or high end work.
A smart move is to offer multiple license options. For example, a lower priced personal license and a higher priced commercial license. That way you capture more buyers without underpricing your work.
To set this up, you’ll need to add multiple variants and set a different price for each of them. You can do that by clicking Add variant further down the page.

Another option is to let your customers decide how much they want to pay based on how much they think your font is worth. Click Pay what you want under price settings to set this up.
Once you’ve set your prices, click Save product and Sellfy will add the product page to your store.
Step 5: Add your payment method(s)
Next, you’ll need to add a payment gateway so that your customers have a way to pay.
From the sidebar, click Settings > Payment settings.

Then, click the relevant button and follow the on-screen instructions to connect either your Stripe or PayPal account (or both).
Step 6: Customize your store’s look and settings
Lastly, you just need to put some final finishing touches to your store.
Go back to your Store settings, then click Customize store to open up the drag-and-drop store editor.

From here you can change the design of your storefront.
Click on any element on the page to edit it directly or drag and drop to change its position, and use the sidebar on the left to navigate to specific pages and change style settings.
When you’re done, click Publish.
You might also want to change other store settings. For example, connect a custom domain, add product categories, set up taxes, etc.
After you’ve done all that, you’re ready to start selling.
6 other places to sell fonts
You don’t have to sell fonts only through your own site.
Third party font marketplaces and foundries already have built in audiences, which can make discovery easier.
The trade off is that they usually take a percentage of each sale. And if you drive traffic to them, you will naturally lose some of that traffic to competitors. But the opposite is also true. So, it’s a double edged sword.
Anyway, if you want to explore that option, here are six of the best places to check out next.
Note: Make sure you check the terms and conditions carefully before you sell your fonts through any third-party platform, and watch out for exclusivity traps. You should only agree to sell fonts non-exclusively so that you can also sell them through your own website.
1. MonoType (MyFonts)
MonoType, the company behind MyFonts, is the leading font marketplace with the largest audience.

So naturally, it’s the best choice if you’re trying to reach as many potential customers as possible.
However, it also has one of the most brutal contracts of any vendor. Designers only earn 50% commissions on MyFonts and 25% on fonts sold elsewhere (e.g. on Monotype Fonts or by their enterprise sales team).
Another thing worth noting is that Monotype requires their partners to release all their fonts with them. That might be a problem if you want to sell some of your fonts exclusively through your site or another distributor.
2. Creative Market
Creative Market is another hugely popular online marketplace with over 10 million members, so it’s a good place to get your typefaces seen.

It’s not just for fonts, but also other creative assets like mockups, brushes, graphics, etc. and it caters mostly to graphic designers and brands.
You can sell non-exclusively through Creative Market and once you’re accepted onto the platform, there’s no per-product approval process.
By default, Shops earn 50% of the list price for each font sale on Creative Market. However, these rates can vary by shop/product.
3. Etsy
Etsy caters to a different type of audience than the other platforms we’ve looked at.

It’s less for graphic designers and more for crafters and hobbyists, so it’s a good place to tap into an audience you might not be able to reach elsewhere.
It’s also one of the biggest online shopping marketplaces in the world and reaches millions of shoppers, so discovery is pretty good.
Etsy’s commission rates are much better than most too. They only take a 6.5% transaction fee (plus a $0.20 listing fee), with the rest going to you.
4. Behance
Behance isn’t really a font marketplace. It’s more of a social media platform designed for creatives.

Users can sign up to Behance to showcase their creative projects or browse other users’ projects for inspiration.
However, you can also sell assets through your projects. You just need to connect Stripe to your account, upload your font and license, and set a price.
Other users who discover your project will then see the option to buy your font, with Behance taking a 30% cut of each sale. I know a lot of designers who have sold a ton of licenses this way.
5. Fontspring
Fontspring is another big font marketplace with a large audience.

It offers a similar commission structure to MonoType, paying 50% royalties on every self-serve font sale through the platform.
However, they also offer bonus royalties of 35% on sales of fonts released in the last 30 days, which helps to bump up your earnings.
It has pretty good vendor tools for creating sales and tracking analytics, etc. too, and offers flexible licensing fees.
6. Future Fonts
Future Fonts is a popular indie platform where you can sell fonts that are still in development.

Users go there to license typefaces that are a work in progress in exchange for early discounts and the chance to get their hands on ‘the next big font’ before it’s overused.
I’m not sure how much commission they pay per sale as they don’t list that information anywhere on their website, but I’ve heard good things from other designers.
It’s a highly curated platform, so you’ll have to submit your typeface and wait for it to be reviewed, with no guarantees that they’ll accept it.
Tips for marketing your fonts
If you want to maximize your sales, you’ll need to spend some time marketing your fonts. Here are some strategies you can try:
- Offer a free license. Consider making your font free for personal use (or offer a limited demo version with fewer characters). The free version will function as a lead magnet, helping you to reach a wide audience of potential customers who might then upgrade to your paid commercial license/full version later.
- Optimize for search. A lot of font sellers make the bulk of their sales through organic search. Make sure you optimize all your listings and product pages around the keywords your target customers are searching for to stand the best chance of ranking in the results pages.
- Use social media. Social media is a great place to promote your fonts, particularly visual channels like Pinterest and Instagram. Share short-form videos promoting your fonts on TikTok, post graphics/preview images to Instagram, Tweet discount codes out on X, etc.
- Join relevant online communities. Find online communities (i.e. Facebook Groups, Subreddits, etc.) where graphic designers, startups, and typography enthusiasts hang out and market your fonts there (making sure to stick to the community rules). For example, r/typography and r/fonts are good places to start.
- Run paid ads. Set up an ad campaign on Google Ads, Meta Ads, etc. to drive targeted traffic to your font store or product pages. Keep your budget small initially and experiment with targeting options until you’re getting a positive return on investment, then scale up.
- Use email marketing. Use a lead magnet (like a free font) to get potential customers to sign up for your mailing list. Then, nurture those leads with regular emails until they’re ready to convert. Sellfy offers basic email marketing features like abandoned cart emails to help with this but a third-party tool like MailerLite if you also want to run an email newsletter.
Final thoughts
hat wraps up our step-by-step guide to selling fonts online.
The best way to sell your fonts is on your own website, and Sellfy makes that simple.
You can also list fonts on third-party platforms like MyFonts, Creative Market, and Etsy, but remember they take a cut of each sale.
Use font creation tools like FontForge or Calligraphr, and aim for complete font families with multiple weights and special characters. These have more appeal than single-weight fonts.
Finally, niche down. Targeting a specific market makes it easier to stand out, compete with other designers, and make consistent sales.
While you’re here, you might want to take a look at our roundup of the best digital products to sell online. Plus, check out the best platforms to sell digital products this year.
Related reading: